Well Event Table
A well event is a record of an activity in the wellbore, observed while drilling. Well events are divided in ten categories - Drilling conditions, Fluids, Geological, Geomechanics, Hole Conditions, Other, Service delivery, Time specific, Well Construction and Well Placement. JewelSuite has thirty six predefined, custom
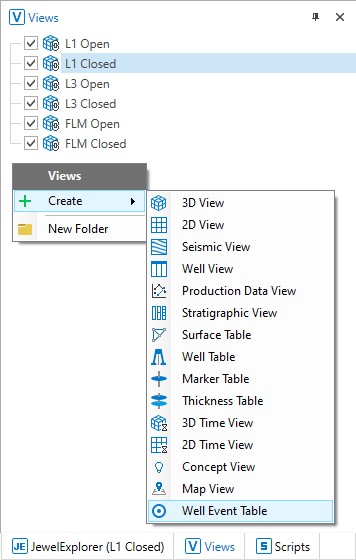
Open a Well Event Table from the View Explorer. click to enlarge
In the table, use the Create Well Event button  to open the Create well event form. To edit an existing well event, select the well event entry in the table and click on the Edit Well Event button
  to open the Edit well event form. To delete a well event entry, select the well event and click on the Delete Well Event button
  . You can delete multiple well events by holding the Ctrl key and selecting the well events.
Use the tools available on the Data Inventory of JewelExplorer view to perform the following actions:
|
|
Template Select a template for the Well Event Table from the drop-down list to be displayed in the table. You can also select None if you want to create your own view for the table. |
|
|
Click the |

|
Save Click the save button while a custom template is active, to choose if you want to create a new template or update the active template. Saving the table is disabled if data is incomplete. |

|
(Re)apply The reapply option 'resets' the view of table with the selected template. |
|
|
Template Manager Opens Well Event Table Template Manager, from which you can rename, import, export or delete templates. |

|
Click to open the Create Well Event form. |

|
Click to open the Edit Well Event form. |
|
|
Select multiple rows in the Well Event Table and click |

|
Click to delete a specific well event. You can delete multiple well events by holding the Ctrl key and selecting the well events. |

|
Export to Excel™ Select the Export to Excel™ button to export the data in an Excel™ spreadsheet in CSV format. A default name is displayed when saving the Excel™ file at the selected destination. You can overwrite the default name before saving. |
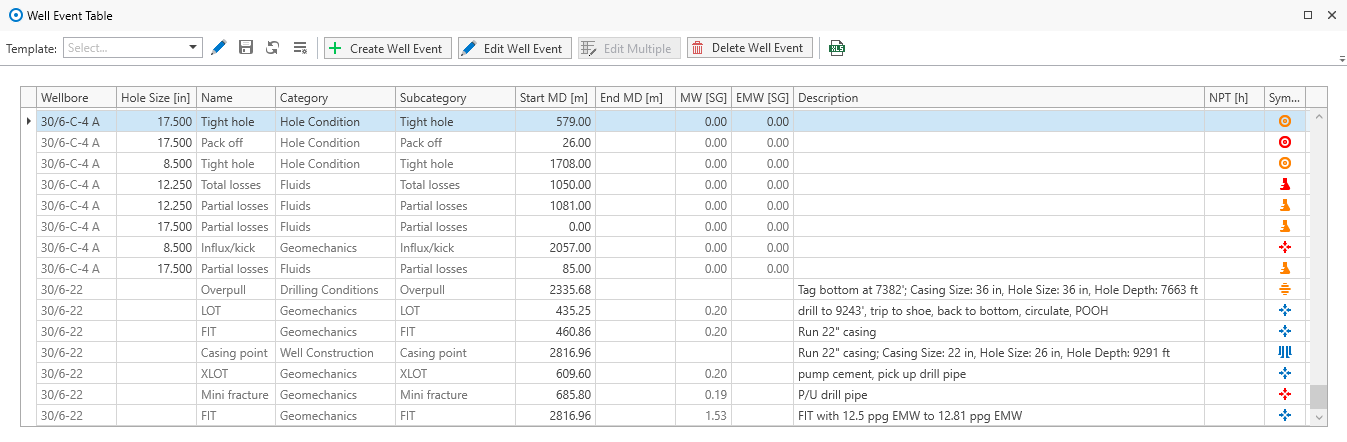
Well event table with the list of well events in the solution. click to enlarge
Each row provides an informative overview for the well event in nine columns.
Wellbore Name of the wellbore with assigned well event.
Hole Size The Hole Size is displayed from the Well Schematics. If the well event relates to more than one hole size, the largest hole size is displayed.
Category Category of the well event (Drilling conditions, Fluids, Geological, Geomechanics, Hole Conditions, Other, Service delivery, Time specific, Well Construction and Well Placement).
Subcategory Subcategory, previously Type of well event. The Subcategory can be selected or edited from the drop-down list.
Name A default name is provided along with the subcategory. You have the possibility to change the name if necessary.
Start MD Measured Depth at the top of the interval of the well event. The well events recorded at a single depth point along the wellbore are stored in this column. Use the context menu of the column header to change the units and format of the depth entries.
End MD Measured Depth at the base of the interval of the well event. This column will be empty for the well events recorded at a single depth point.
Start Date Start Date when a well event is recorded.
End Date End Date when a well event is recorded.
MW or Mud Weight Observed mud weight. Right-mouse click on the units allows you to change the units of the mud weight.
EMW or Equivalent Mud Weight describes the observed equivalent mud weight.
Description Description of the well event in detail.
NPT Displays the duration of the NPT, the Non-productive time.
Symbol Each well event type is represented by a default symbol. All the symbols are tabulated in the Lists of well event categories.
You can filter the well events listed in the table using the filter icon ![]() next to the column headers. Check the box next to the options in the filters list to show the associated events. You can sort the well events on the column headers using the context menu, or by clicking on the column header. Use the Show Search Panel in the context menu (or use Ctrl + F) to search for specific terms in the Well Event Table, and all the relevant entries are filtered.
next to the column headers. Check the box next to the options in the filters list to show the associated events. You can sort the well events on the column headers using the context menu, or by clicking on the column header. Use the Show Search Panel in the context menu (or use Ctrl + F) to search for specific terms in the Well Event Table, and all the relevant entries are filtered.
You can also edit the entries in the well event table when clicking on the selected data row. A right-mouse click opens the context menu that allows you to edit or delete the data row. If you selected more than one data row, you also have the option to edit multiple data rows in the well event table.
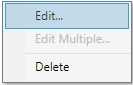
Context menu of the data rows in the Well Event Table. click to enlarge
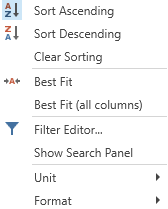
Context menu of the column headers in the Well Event Table. click to enlarge
Lists of well event categories
 )
)| Well event subcategory | Location | |
|---|---|---|
| Point | Interval | |
| Abnormal pressure | ✔ | O |
| Abnormal torque | ✔ | O |
| Axial vibration | ✔ | O |
| Bit/BHA wear | O | ✔ |
| Jarring | ✔ | O |
| Lateral vibration | ✔ | O |
| Low/ reduced/ no ROP | ✔ | O |
| Motor stalling | ✔ | O |
| Overpull | O | ✔ |
| StickSlip | ✔ | O |
| Stuck pipe | ✔ | O |
| Tangential vibration | ✔ | O |
| Temperature | ✔ | O |
| ✔ - Default selection NA - Not applicable. Must provide the location depth in interval only. O - Option to change the location type from the default selection. |
||
 )
)| Well event subcategory | Location | |
|---|---|---|
| Point | Interval | |
| Fluid displacement | ✔ | O |
| LCM | ✔ | O |
| Loss of pump | ✔ | O |
| Partial losses | O | ✔ |
| Pump liner change | ✔ | O |
| Sand content | ✔ | O |
| Total losses | ✔ | O |
| Weighting down | ✔ | O |
| Weighting up | ✔ | O |
| ✔ - Default selection NA - Not applicable. Must provide the location depth in interval only. O - Option to change the location type from the default selection. |
||
 )
)| Well event subcategory | Location | |
|---|---|---|
| Point | Interval | |
| Abrasive Sandstone | ✔ | O |
| Carbonate formation | ✔ | O |
| Chert hazard | ✔ | O |
| Formation hazard | ✔ | O |
| Hard formation | ✔ | O |
| High UCS | ✔ | O |
| Interbedded hazard | ✔ | O |
| Loose sand | ✔ | O |
| Reactive shale | ✔ | O |
| Salt formation | ✔ | O |
| Stringer | ✔ | O |
| Unconsolidated formation | ✔ | O |
| ✔ - Default selection NA - Not applicable. Must provide the location depth in interval only. O - Option to change the location type from the default selection. |
||
 )
)| Well event subcategory | Location | |
|---|---|---|
| Point | Interval | |
| Ballooning/breathing | ✔ | O |
| Break outs | O | ✔ |
| Connection gas | ✔ | O |
| FIT | ✔ | O |
| Influx/Kick | ✔ | O |
| LOT | ✔ | O |
| Mini fracture | ✔ | O |
| XLOT | ✔ | O |
| ✔ - Default selection NA - Not applicable. Must provide the location depth in interval only. O - Option to change the location type from the default selection. |
||
 )
)| Well event subcategory | Location | |
|---|---|---|
| Point | Interval | |
| Overgauge hole | O | ✔ |
| Pack off | ✔ | O |
| Reaming in hole | NA | ✔ |
| Reaming out of hole | NA | ✔ |
| Spiral hole | ✔ | O |
| Tight hole | O | ✔ |
| Washout | ✔ | O |
| ✔ - Default selection NA - Not applicable. Must provide the location depth in interval only. O - Option to change the location type from the default selection. |
||
 )
)| Well event subcategory | Location | |
|---|---|---|
| Point | Interval | |
| Well event | ✔ | O |
| ✔ - Default selection NA - Not applicable. Must provide the location depth in interval only. O - Option to change the location type from the default selection. |
||
 )
)| Well event subcategory | Location | |
|---|---|---|
| Point | Interval | |
| FE data quality | O | ✔ |
| MLWD survey issues | ✔ | O |
| FE data quality | O | ✔ |
| Casing running difficulties | O | ✔ |
| Fishing | ✔ | O |
| FOOS | ✔ | O |
| Good Run | ✔ | O |
| MLWD communication issues | ✔ | O |
| MLWD failure | ✔ | O |
| MLWD firmware issues | ✔ | O |
| MLWD measurement issues | ✔ | O |
| MLWD memory data issues | ✔ | O |
| MLWD survey issues | ✔ | O |
| Motor failure | ✔ | O |
| Non PSDI event | ✔ | O |
| NPT event | ✔ | O |
| Ongoing w/failure | ✔ | O |
| Other TF/SF | ✔ | O |
| POOH due to failure | ✔ | O |
| PSDI event | ✔ | O |
| RSS failure | ✔ | O |
| RSS Rib failure | ✔ | O |
| Rubber over shakers | ✔ | O |
| Surface, remote connectivity | ✔ | O |
| Surface, software | ✔ | O |
| Tool face control issues | ✔ | O |
| Unable to meet well trajectory | ✔ | O |
| ✔ - Default selection NA - Not applicable. Must provide the location depth in interval only. O - Option to change the location type from the default selection. |
||
 )
)| Well event subcategory | Location | |
|---|---|---|
| Point | Interval | |
| Bit/BHA trip | ✔ | O |
| Casing running | ✔ | O |
| Liner running | ✔ | O |
| Logging | ✔ | O |
| Rig maintenance | ✔ | O |
| Time drilling | ✔ | O |
| Wait on cement | ✔ | O |
| Wait on weather | ✔ | O |
| ✔ - Default selection NA - Not applicable. Must provide the location depth in interval only. O - Option to change the location type from the default selection. |
||
 )
)| Well event subcategory | Location | |
|---|---|---|
| Point | Interval | |
| Abnormal casing wear | O | ✔ |
| Casing point | ✔ | O |
| Casing window | ✔ | O |
| Fish (LIH) | ✔ | O |
| Junk/debris | ✔ | O |
| ✔ - Default selection NA - Not applicable. Must provide the location depth in interval only. O - Option to change the location type from the default selection. |
||
 )
)| Well event subcategory | Location | |
|---|---|---|
| Point | Interval | |
| Building angle | ✔ | O |
| Dogleg severity | ✔ | O |
| Dropping inclination | ✔ | O |
| Kick off point | ✔ | O |
| JewelSuite Subsurface Modeling decision | ✔ | O |
| JewelSuite Subsurface Modeling observation | ✔ | O |
| Turning | ✔ | O |
| Walking | ✔ | O |
| ✔ - Default selection NA - Not applicable. Must provide the location depth in interval only. O - Option to change the location type from the default selection. |
||